section 1-4 에서 Spring Cloud Config 서비스를 만들었고 start 시켰다.
Spring Cloud Config 가 관리 하는 ecommerce.yml ( git 에 올라간것) 에 등록된 config 정보를
각각의 MSA 가 가져다 쓰려면 각각의 MSA 는 아래 의존성을 주입해야 한다.
내가 만든 예제 MSA ( user-service, order-service, catalog-service, apigateway-service) 는 아래 내용을 주입 받아야 한다.
각각의 MSA 의 pom.xml 파일에 아래 내용 추가한다.
아래 의존성을 주입해줘야
각각의 MSA 가 Spring Cloud Config 서비스와 통신을 할수 있다.
<dependency>
	<groupId>org.springframework.cloud</groupId>
    <artifactId>spring-cloud-starter-config</artifactId>
</dependency>
<dependency>
	<groupId>org.springframework.cloud</groupId>
    <artifactId>spring-cloud-starter-bootstrap</artifactId>
</dependency>
의존성은 주입했기 때문에 통신을 할수 있는 api들은 주입이 된것인데
실제 Spring Cloud Config 가 어디 있는지 위치를 알아야 통시을 할거 아닌가?
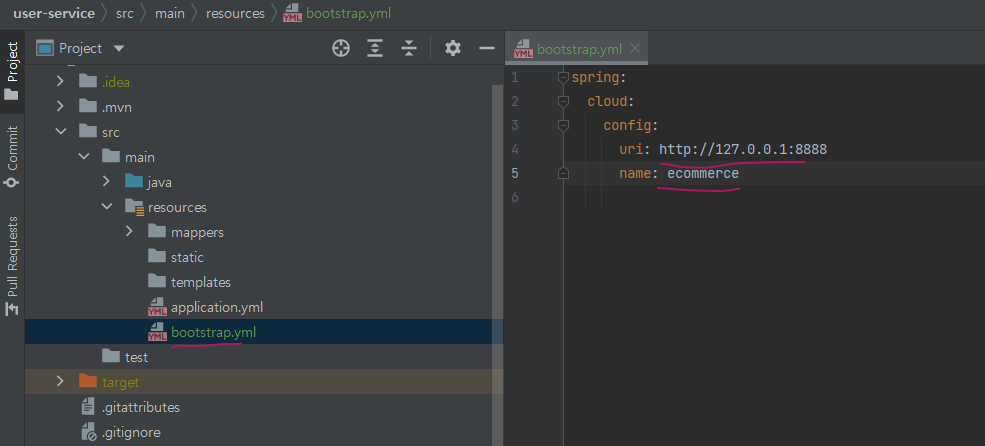
그래서 resouces 폴더 아래 bootstrap.yml 파일을 만들고
Spring Cloud Config의 위치 정보와 어떤 yml파일을 사용하는지를 정해야 한다.
Spring Cloud Config 의 위치는: http://127.0.01
Spring Cloud Config 가 관리하는 yml 파일 중 이름이 ecommerce 인걸 사용한다.
Spring Cloud Config가 일괄적으로 Config 정보를 가지고 있고각각의 MSA 가 그 정보를 이용한다.
Spring Cloud Config 가 가진 Config 정보가 변경시, MSA 의 restart 없이 정보를 refresh 해서 갱신 하려면
1. Spring boot 의 Actuator 를 이용 하면 된다.
이걸 사용 하려면 또 의존성을 넣어야 한다.
아래 의존성을 Spirng Cloud Config 를 사용할 MSA 에 모두 넣는다 ( user-service, order-service, catalog-service, apigateway-service)
    <dependency>
      <groupId>org.springframework.boot</groupId>
      <artifactId>spring-boot-starter-actuator</artifactId>
    </dependency>
Actuator 를 쓰려면 각각 MSA (user-service, order-service, catalog-service, apigateway-service) applicaiton.yml 파일에 아래 내용도 추가 해줘야 한다.
#Actuator 를 사용 하기 위해 아래내용 추가해야함.
management:
  endpoints:
    web:
      exposure:
        include: refresh, health, beans, httpexchanges, busrefresh, info, metrics, prometheus
멀 맨날 알아야 할게 이리 많고 넣어야 할게 이리 많은지 . 짜증난다. 배운걸 정리 하는것도
알아야 할게 너무 많아서 쳐 넣는것도 양이 엄첨나다.

아래와 같이 refresh 없이 바뀐 config 를 다시 읽는지 test 해봤다.
1) Spring Cloud Config server start
2) Spring Cloud Config server 가 읽어오는 git 파일 (ecommerc) 내용 수정
3) user-service 를 direct 로 호출 해서 (apigateway 거치지 않고) refresh 수행 해봄
"http://localhost:가상포트/user-service/actuator/refresh" -> post로 호출함(postman에서) --> 결과는 403 error
이유는 actuator 앞에 /user-service 가 붙어 있어서 그랬다.
Spring Actuator는 기본적으로 /actuator/refresh 임. port 뒤에 바로 와야지 중간에 머가 안 붙어야 함.
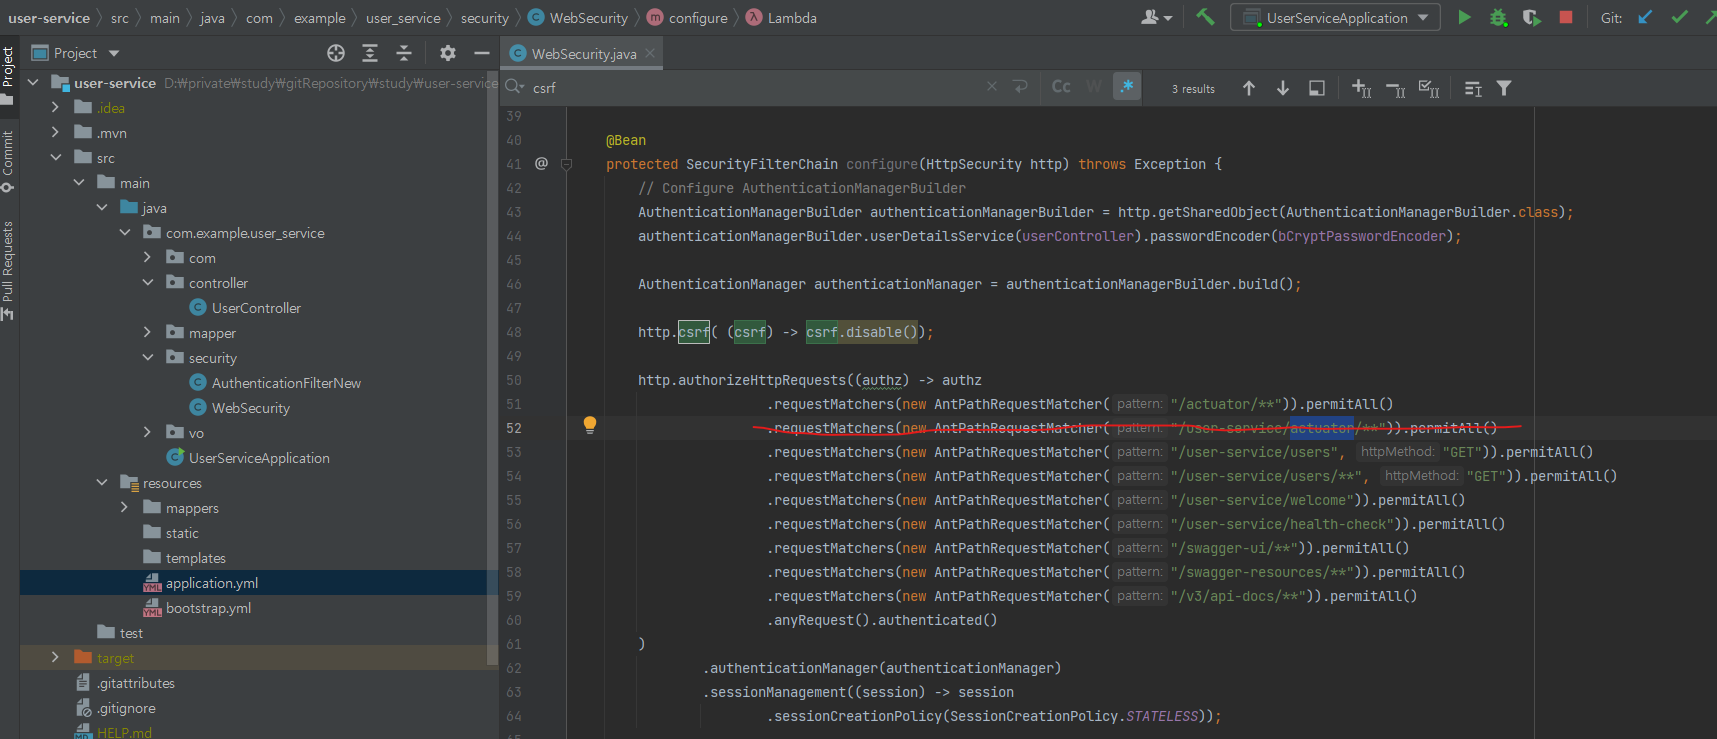
이말은 아래처럼 permitAll() 주는 설정이 잘못됐다는 말임.
잘못된 부분은 빨간줄로 그었고 그부분은 지어야 하고 그 윗 부분이 들어가야함.
4) http://localhost:9188/user-service/actuator/refresh 로 날리니 정상 작동함( 9188은 매번 바뀌는 port)
5) apigateway-service를 통해서 요청을 하는경우 ( 위에처럼 바로 user-service 로 안가고)
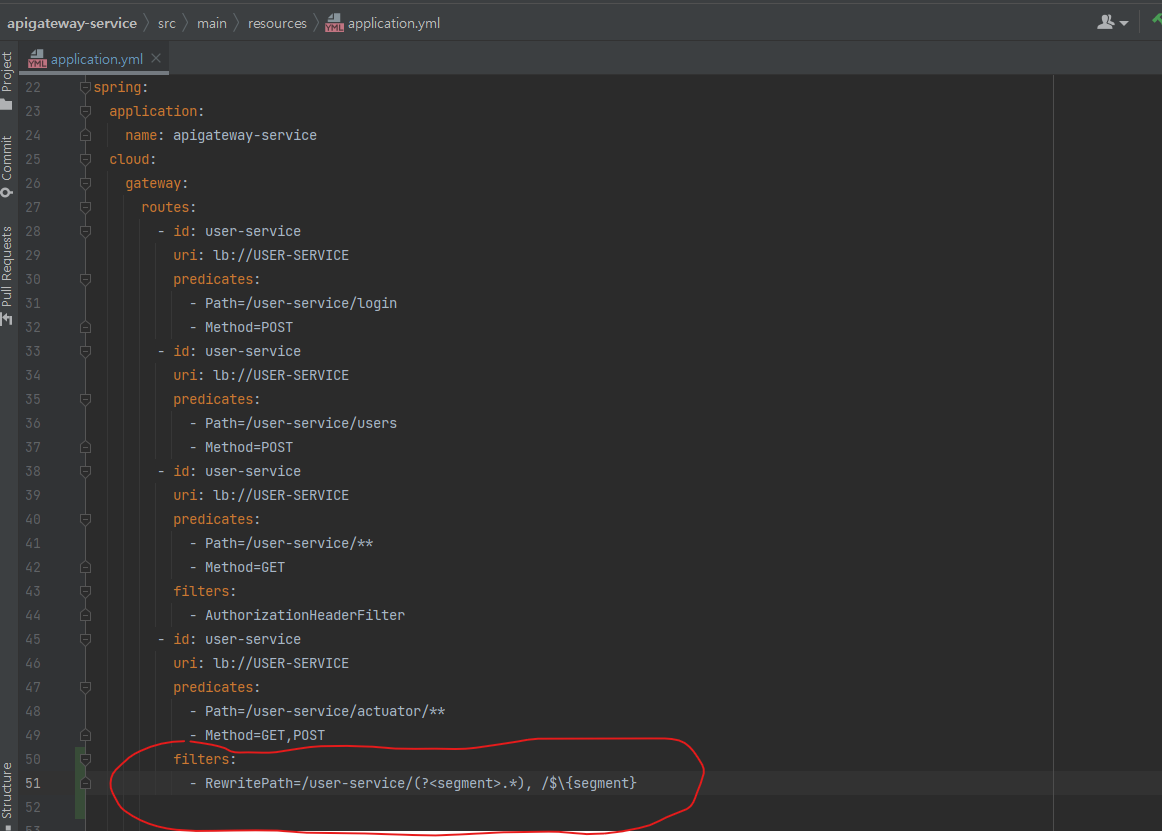
/user-service/ 가 붙어서 user-service msa 로 가기 때문에 apigateway-service 에 route 정보를 고쳐야 함. ( /user-service 를 빼도록)
위의 방법은 만약 MSA 가 100개면 100개에 각각 아래 명령어를 날려야 한다.
http://localhost:8000/user-service/actuator/refresh
http://localhost:8000/order-service/actuator/refresh
http://localhost:8000/catalog-service/actuator/refresh
...
http://localhost:8000/apgateway-service/actuator/refresh
100개 .
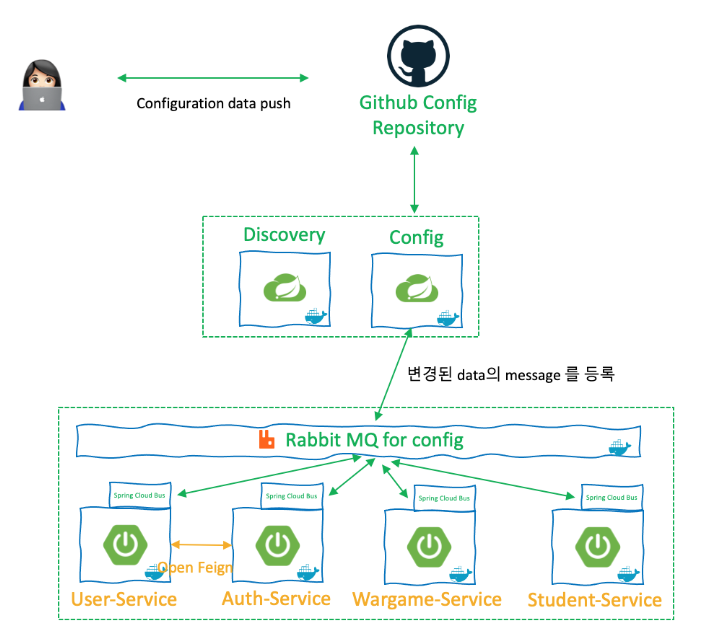
하여 아래처럼 Spring Cloud BUS 를 사용 하는 방법이 있다고 한다.
2. Spring Cloud BUS 사용 하는 법
MESSAGE BUS 로 RABBITMQ를 쓴다.
아래 처럼 작동 한다는데 이걸 구현 하려면 또 bus 관련 의존성을 넣어야 한다.
어디에
Spring Cloud Config ,apigateway-service,user-service,catalog-service,order-service
<dependency>
	<groupId>org.springframework.cloud</groupId>
	<artifactId>spring-cloud-starter-bus-amqp</artifactId>
<dependency>
의존성도 넣고 rabbitmq 정보도 다 application.yml 에 수정해야 한단다.
정말 분산이란 이름으로 시스템 구현하는건.
개짜증.
손볼일도 많고 알아야 할것도, 설정도 천지빼가리.

쓰다 지쳐서..나중에 계속 써야 겠다.
하루 지나 다시 쓴다...
암튼 요점은.
1번 방식의 http://localhost:8000/user-service/actuator/refresh 라고 요청 하면
-> apigateway 에서 /user-service/ 를
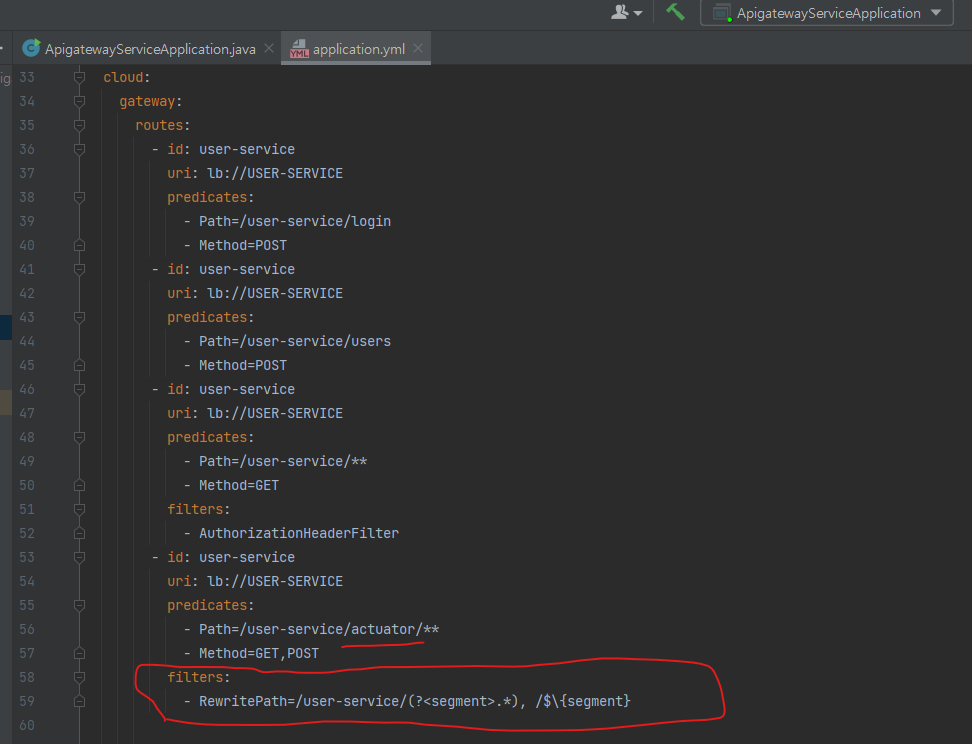
filters:
Rewritepath 설정때문에 떼어 보리고 user-service(msa) 를 eureka server 에서 찾고
찾아서 호출시 http://localhost:xxx(가상포트)/actuator/refresh 로 호출 한다.
-> 그러면 user-service (msa) 가 받아서 actuator/refresh 를 수행 해하고
(참고: 수행 할수 있는건 actuator 관련 의존성을 넣었고, application.yml 파일에
management: endpoint ~~~ 를 설정 했기 때문이다.
)
-> Spring Cloud Config 에서 관리하는 config 를 refresh 해 온다.
근데 이건 많은 msa 중에 딱 하나 user-service 에 대한 refresh를 한거고
다른 msa 도 refresh 가 필요 하니 각각 actuator 가 포함된 url 로 수행을 해줘야 한다.
이건 msa 가 많을 경우 유지가 거의 불가능 하니.
많은 msa 중 한놈만 refresh 가 되도 다른 msa들이 refresh 를 인지 하고 각각 알아서 refresh 하는
기능을 쓰는건데
그게 2번 Spring Cloud Bus 방식이고
Bus 로 rabbitmq 를 쓰니까 rabbitmq을 깔아야 하는거고 ( rabbitmq 설치 전 ㅣㄷsection 1-4 에서 Spring Cloud Config 서비스를 만들었고 start 시켰다.
Spring Cloud Config 가 관리 하는 ecommerce.yml ( git 에 올라간것) 에 등록된 config 정보를
각각의 MSA 가 가져다 쓰려면 각각의 MSA 는 아래 의존성을 주입해야 한다.
내가 만든 예제 MSA ( user-service, order-service, catalog-service, apigateway-service) 는 아래 내용을 주입 받아야 한다.
각각의 MSA 의 pom.xml 파일에 아래 내용 추가한다.
아래 의존성을 주입해줘야
각각의 MSA 가 Spring Cloud Config 서비스와 통신을 할수 있다.
<dependency>
<groupId>org.springframework.cloud</groupId>
<artifactId>spring-cloud-starter-config</artifactId>
</dependency>
<dependency>
<groupId>org.springframework.cloud</groupId>
<artifactId>spring-cloud-starter-bootstrap</artifactId>
</dependency>
의존성은 주입했기 때문에 통신을 할수 있는 api들은 주입이 된것인데
실제 Spring Cloud Config 가 어디 있는지 위치를 알아야 통시을 할거 아닌가?
그래서 resouces 폴더 아래 bootstrap.yml 파일을 만들고
Spring Cloud Config의 위치 정보와 어떤 yml파일을 사용하는지를 정해야 한다.
Spring Cloud Config 의 위치는: http://127.0.01
Spring Cloud Config 가 관리하는 yml 파일 중 이름이 ecommerce 인걸 사용한다.
Spring Cloud Config가 일괄적으로 Config 정보를 가지고 있고 각각의 MSA 가 그 정보를 이용한다.
Spring Cloud Config 가 가진 Config 정보가 변경시, MSA 의 restart 없이 정보를 refresh 해서 갱신 하려면
1. Spring boot 의 Actuator 를 이용 하면 된다.
이걸 사용 하려면 또 의존성을 넣어야 한다.
아래 의존성을 Spirng Cloud Config 를 사용할 MSA 에 모두 넣는다 ( user-service, order-service, catalog-service, apigateway-service)
<dependency>
<groupId>org.springframework.boot</groupId>
<artifactId>spring-boot-starter-actuator</artifactId>
</dependency>
Actuator 를 쓰려면 각각 MSA (user-service, order-service, catalog-service, apigateway-service) applicaiton.yml 파일에 아래 내용도 추가 해줘야 한다.
#Actuator 를 사용 하기 위해 아래내용 추가해야함.
management:
endpoints:
web:
exposure:
include: refresh, health, beans, httpexchanges, busrefresh, info, metrics, prometheus
멀 맨날 알아야 할게 이리 많고 넣어야 할게 이리 많은지 . 짜증난다. 배운걸 정리 하는것도
알아야 할게 너무 많아서 쳐 넣는것도 양이 엄첨나다.
아래와 같이 refresh 없이 바뀐 config 를 다시 읽는지 test 해봤다.
1) Spring Cloud Config server start
2) Spring Cloud Config server 가 읽어오는 git 파일 (ecommerc) 내용 수정
3) user-service 를 direct 로 호출 해서 (apigateway 거치지 않고) refresh 수행 해봄
"http://localhost:가상포트/user-service/actuator/refresh" -> post로 호출함(postman에서) --> 결과는 403 error
이유는 actuator 앞에 /user-service 가 붙어 있어서 그랬다.
Spring Actuator는 기본적으로 /actuator/refresh 임. port 뒤에 바로 와야지 중간에 머가 안 붙어야 함.
이말은 아래처럼 소스에서 permitAll() 주는 설정에 actuator 만 /user-service/ 가 빠져야 한다는 말이다.

4) http://localhost:9188/actuator/refresh 로 날리니 정상 작동함( 9188은 매번 바뀌는 port)
http://localhost:9188/user-service/actuator/refresh <- 작동 안하는것임
위의 port 는 apigateway-serive 의 dashboar에서 user-service APPLICATOIN 클릭해 보면 나옴.

5) apigateway-service를 통해서 요청을 하는경우 ( 위에처럼 바로 user-service 로 안가고)
/user-service/ 가 붙어서 user-service msa 로 가기 때문에 apigateway-service 에 route 정보를 고쳐야 함.
( /user-service 를 빼도록 filters: rewritepath 설정 해야 함. )
위의 방법은 만약 MSA 가 100개면 100개에 각각 아래 명령어를 날려야 한다.
http://localhost:8000/user-service/actuator/refresh
http://localhost:8000/order-service/actuator/refresh
http://localhost:8000/catalog-service/actuator/refresh
...
http://localhost:8000/apgateway-service/actuator/refresh
100개 .
하여 아래처럼 Spring Cloud BUS 를 사용 하는 방법이 있다고 한다.
2. Spring Cloud BUS 사용 하는 법
MESSAGE BUS 로 RABBITMQ를 쓴다.
아래 처럼 작동 한다는데 이걸 구현 하려면 또 bus 관련 의존성을 넣어야 한다.
어디에
Spring Cloud Config ,apigateway-service,user-service,catalog-service,order-service
<dependency>
<groupId>org.springframework.cloud</groupId>
<artifactId>spring-cloud-starter-bus-amqp</artifactId>
<dependency>
의존성도 넣고 rabbitmq 정보도 다 application.yml 에 수정해야 한단다.
정말 분산이란 이름으로 시스템 구현하는건.
개짜증.
손볼일도 많고 알아야 할것도, 설정도 천지빼가리.
쓰다 지쳐서..나중에 계속 써야 겠다.
하루 지나 다시 쓴다...
암튼 긴들의 요점은.
1번 방식의 http://localhost:8000/user-service/actuator/refresh 라고 요청 하면
-> apigateway 에서 /user-service/ 를
filters:
Rewritepath 설정때문에 떼어 보리고 user-service(msa) 를 eureka server 에서 찾고
찾아서 호출시 http://localhost:xxx(가상포트)/actuator/refresh 로 호출 한다.
-> 그러면 user-service (msa) 가 받아서 actuator/refresh 를 수행 해하고
(참고: 수행 할수 있는건 actuator 관련 의존성을 넣었고, application.yml 파일에
management: endpoint ~~~ 를 설정 했기 때문이다.
)
-> Spring Cloud Config 에서 관리하는 config 를 refresh 해 온다.
근데 이건 많은 msa 중에 딱 하나 user-service 에 대한 refresh를 한거고
다른 msa 도 refresh 가 필요 하니 각각 actuator 가 포함된 url 로 수행을 해줘야 한다.
이건 msa 가 많을 경우 유지가 거의 불가능 하니.
많은 msa 중 한놈만 refresh 가 되도 다른 msa들이 refresh 를 인지 하고 각각 알아서 refresh 하는
기능을 쓰는건데
그게 2번 Spring Cloud Bus 방식이고
Bus 로 rabbitmq 를 쓰니까 rabbitmq을 깔아야 하는거고
( rabbitmq 설치 전 Erlang 을 먼저 설치 해야함, 설치후 rabbitmq 와 Erlang 모두 환경변수의 PATH 에 추가함)
깔고 나서 rabbitmq를 "rabbitmq-server" 명령어로 start 시킨다.

Spring Cloud Config가 관리 하는 yml 파일을 보는 msa 들이 모두 rabbitmq 의 정보를 applicaiton.yml 에 추가 했고
bus 를 사용 할수 있도록 " spring-cloud-starter-bus-amqp"도 의존성으로 넣었으며
아래 actuator 명령중 busrefresh 를 넣었으므로
management:
endpoints:
web:
exposure:
include: refresh, health, beans, httpexchanges, busrefresh, info, metrics, prometheus
여러 msa 중에 bus 와 연결된 한녀석에게만 busrefresh 라는 명령을 보내면 알아서 나머지도 다 refresh가 된다.
이런 이야기다
나는 user-service 에만 busrefresh 를 발송 했다.
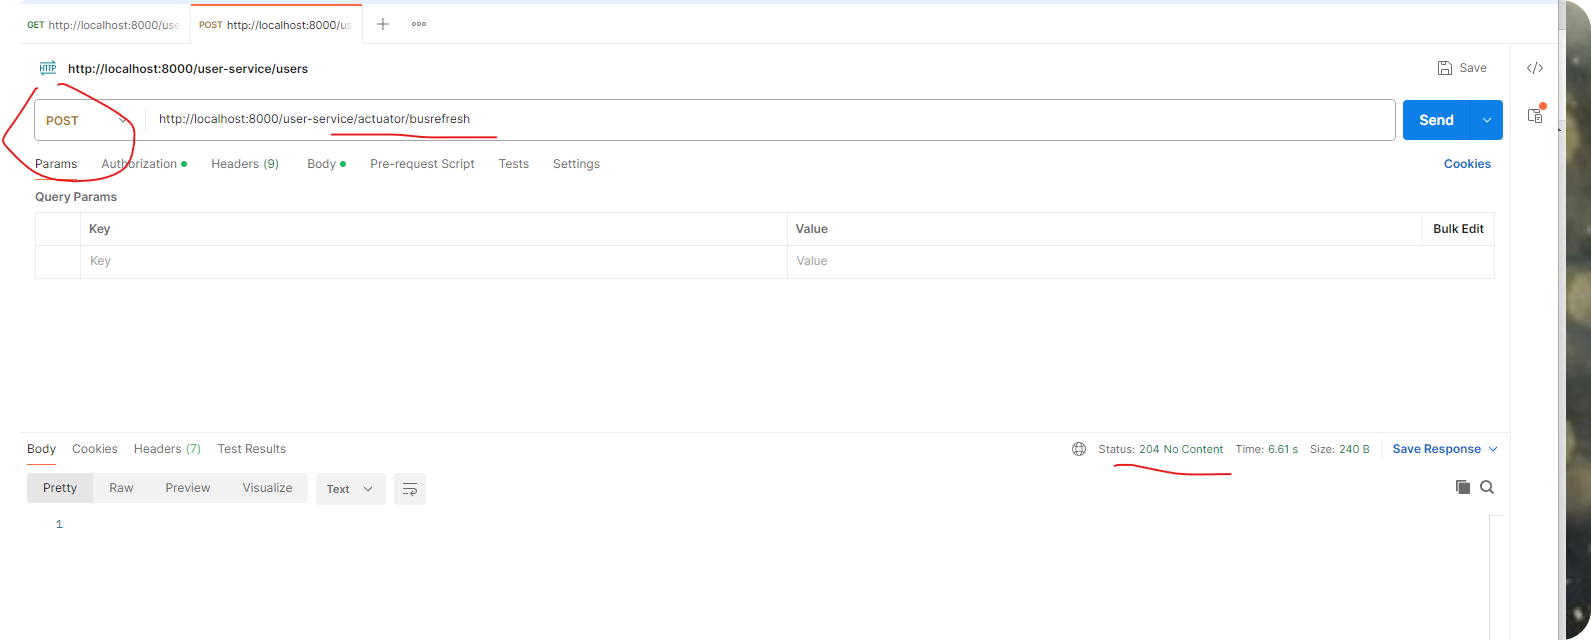
busrefresh 를 받은 user-service 에 아래처럼 log가 나오면 정상 refresh가 된것이란다.

그리고 다른 msa 중 apigateway-service 에 log를 확인 했더니 유사한 204 status 로 refresh 를 한다는 내용이 있다.
이걸로 rabbitmq bus 가 동작 하는것이 확인 됐다.

징글 징글하다 .이눔의 설정과 많은 프로세스 기동, 설치.
'SI 업무 > MSA관련' 카테고리의 다른 글
| secton 1-7. FeignClient log 사용 (0) | 2024.12.31 |
|---|---|
| section 1-6. (FeignClient) msa -> msa 호출하는법 (2) | 2024.12.30 |
| section 1-4. Spring Cloud Config (0) | 2024.12.29 |
| section 1-3. MSA 구성 설명/ gateway 설정 설명/ (0) | 2024.12.29 |
| section 1-2. user-service, catalog_service, order_service APIs (0) | 2024.12.27 |


